Building a Sitecore AI Marketplace App: SiteElevate - Content Health Dashboard
Published: 21 May 2026

How to build a live SEO and content audit app using Next.js, TypeScript, and the Sitecore Marketplace SDK
Before Getting Started, What Is the Sitecore Marketplace?
The Sitecore Marketplace enables customers, partners, and developers to extend SitecoreAI by building custom applications using supported extension points. These applications integrate directly into the SitecoreAI interface, allowing organizations to add tailored functionality and streamline specific business workflows.
Marketplace applications can be:
- Private – Available only within your organization for internal use cases and custom workflows
- Public – Designed for broader distribution and reuse across organizations (public marketplace availability is currently limited)
Introduction
Goal:
The goal of this project was to build a custom Sitecore AI Marketplace app that gives content editors, marketers, and SEO teams instant visibility into the health of every page on their SitecoreAI site, without leaving Sitecore.
The Problem:
SitecoreAI has no native tool for auditing content quality across all pages at once. When a site grows to hundreds or thousands of pages, critical issues become invisible:
- Pages with missing meta descriptions that hurt search rankings
- Images without alt text, accessibility violations that affect compliance
- Pages with thin content (under 300 words) that struggle to rank on Google
- Missing canonical tags causing duplicate content penalties
- Poor internal linking structure that prevents proper site indexing
Finding these issues previously required external tools, manual exports, and separate review sessions completely outside of Sitecore.
The Solution:
SiteElevate is a Next.js 14 app registered as a custom Sitecore AI Marketplace application. It connects to SitecoreAI via the Authoring GraphQL API, fetches every page at all depth levels using a breadth-first traversal, scores each page across 7 weighted health checks, and displays the results through 3 extension points directly inside Sitecore.
General Prerequisites
Before getting started, make sure you have:
| Sitecore Portal Access | Organisation Owner or Admin role required. Marketplace apps are limited to these roles. |
| SitecoreAI Environment | A running SitecoreAI environment with the Authoring GraphQL API accessible. |
| Node.js 18+ | Required for Next.js 14. Check with: node -v |
| npm 10+ | Package manager. Check with: npm -v |
| Vercel Account | Free tier works. Used to host the app publicly so Sitecore can load it in an iframe. |
| GitHub Account | Source code repository and auto-deploy trigger for Vercel. |
| TypeScript Knowledge | Familiarity with TypeScript and React is enough to follow along. |
Tech Stack (Libraries Used):
| Library / Tool | Version | Purpose |
|---|---|---|
| Next.js | 14.2.3 | App Router, server-side API routes, React framework |
| React | 18.3.1 | UI component library |
| TypeScript | 5.x | Type safety across all files |
| Tailwind CSS | 3.4.1 | Utility-first styling framework |
| @sitecore-marketplace-sdk/client | 0.3.2 | Marketplace authentication and SDK communication |
| @sitecore-marketplace-sdk/xmc | 0.4.1 | SitecoreAI API access helpers |
| Recharts | 2.12.7 | Bar chart and Radar chart visualisations |
| Vercel | — | Hosting and continuous deployment from GitHub |
Getting Started (Setup):
Step 1: Create the Project
Initialise a new Next.js 14 project with TypeScript and Tailwind CSS:
npx create-next-app@latest siteelevate \
  --typescript \
  --tailwind \
  --app \
  --no-src-dir

cd siteelevate
Step 2: Install Dependencies
npm install \
  @sitecore-marketplace-sdk/client@0.3.2 \
  @sitecore-marketplace-sdk/core@0.3.2 \
  @sitecore-marketplace-sdk/xmc@0.4.1 \
  recharts
Step 3: Configure next.config.js for Sitecore iFrame Embedding
This is the most critical configuration step. Without the correct Content Security Policy headers, Sitecore cannot load your app in an iframe and will show a broken page icon.
/** @type {import('next').NextConfig} */
const nextConfig = {
  async headers() {
    return [{
      source: "/(.*)",
      headers: [
        { key: "X-Frame-Options", value: "ALLOWALL" },
        {
          key: "Content-Security-Policy",
          value: [
            "frame-ancestors 'self'",
            "https://*.sitecorecloud.io",
            "https://portal.sitecorecloud.io",
            "https://pages.sitecorecloud.io",
            "https://xmc-*.sitecorecloud.io",
          ].join(" "),
        },
      ],
    }];
  },
};

module.exports = nextConfig;
⚠️ Common mistake: Forgetting https://*.sitecorecloud.io in frame-ancestors is the #1 reason the app shows a broken icon when opened inside Sitecore. Always include all subdomains.
The Main Code (Architecture & Explainers)
Part A: The Health Scoring Engine (src/lib/healthScorer.ts)
The core of the app is a scoring engine that evaluates each page across 7 weighted checks and produces a final score from 0 to 100.
Key Points to Highlight:
- Each check returns a status (pass / warn / fail), a score (0 - 100), and a weight (importance percentage)
- The final score is a weighted average: sum (score × weight) / sum(weights)
- Scores map to grades: A (90 - 100), B (75 - 89), C (60 - 74), D (40 - 59), F (0 - 39)
- The PageHealthResult and SiteHealthSummary interfaces are the key data shapes used throughout the app
// src/lib/healthScorer.ts

export interface HealthCheck {
  id: string;
  label: string;
  status: "pass" | "warn" | "fail";
  message: string;
  score: number;   // 0-100
  weight: number;  // importance %
}

export interface PageHealthResult {
  pageId: string;
  pageName: string;
  pageUrl: string;
  overallScore: number;
  grade: "A" | "B" | "C" | "D" | "F";
  checks: HealthCheck[];
  lastModified: string | null;
}

// Weighted average score calculation
export function scorePage(page: PageHealthData): PageHealthResult {
  const checks = [
    checkMetaTitle(page.metaTitle),      // weight: 20%
    checkMetaDescription(page.metaDescription), // weight: 15%
    checkH1(page.h1),                   // weight: 15%
    checkImages(page.images),            // weight: 20%
    checkWordCount(page.wordCount),      // weight: 15%
    checkCanonical(page.hasCanonical),   // weight: 10%
    checkInternalLinks(page.internalLinks), // weight: 5%
  ];

  const totalWeight = checks.reduce((s, c) => s + c.weight, 0);

  const overallScore = Math.round(
    checks.reduce((s, c) => s + (c.score * c.weight) / totalWeight, 0)
  );

  return { ...page, overallScore, grade: scoreToGrade(overallScore), checks };
}
Part B: The GraphQL API Client (src/lib/sitecoreApi.ts)
This module handles all communication with the SitecoreAI Authoring GraphQL API. The most important pattern here is the breadth-first traversal - the technique used to fetch pages at all depth levels.
The Problem with Nested Pages
Sitecore's Authoring GraphQL API does not support recursive fragments. A page like /logg-inn/min-side/ordrehistorikk is 3 levels deep. A single query only returns direct children. To get all pages, you need to go deeper.
The Breadth-First Solution
- Start with the Home item ID in a queue
- Fetch children of all items in the queue using the same query called in parallel
- Add found items to the results list AND to the queue for the next round
- Repeat up to 4 levels deep, covers virtually all Sitecore site structures
Below is the working query (confirmed in Sitecore environment)
const GET_PAGES_BY_PATH_QUERY = `
 query GetPagesByPath($rootItemId: String!, $language: String!) {
    item(path: $rootItemId, language: $language) {
      children(hasLayout: true, first: 50) {
        results {
          id  name  path
          fields { name value }
          updated: field(name: "__Updated") { value }
          displayName: field(name: "__Display name") { value }
        }
      }
   }
  }
`;

// Breadth-first traversal

const queue = [homeItemId];
const visited = new Set([homeItemId]);

while (queue.length > 0 && depth < 4) {
  depth++;
  const currentLevel = [...queue];
  queue.length = 0;

  // Fetch children of ALL items at this level IN PARALLEL

  const levelResults = await Promise.all(
    currentLevel.map((parentId) => fetchChildren(accessToken, endpoint, parentId, language))
  );

  for (const children of levelResults) {
    for (const child of children) {
      if (!child?.id || visited.has(child.id)) continue;

      visited.add(child.id);
      allPages.push(child);
      queue.push(child.id); // queue for next level
    }
  }
}
The FIELD_MAP - Template-Agnostic Field Resolution
Different Sitecore templates use different field names for meta titles and descriptions. The FIELD_MAP tries multiple candidates in order and returns the first non-empty value:
export const FIELD_MAP = {
  metaTitle: [
    'SEO_Title', 'MetaTitle', 'Title',
    'Browser Title', 'BrowserTitle', 'OpenGraph Title',
  ],

  metaDescription: [
    'SEO_Description', 'MetaDescription',
    'Meta Description', 'Description', 'Abstract',
  ],

  // ... heading, bodyContent, canonical
};

// resolveField() tries each candidate in order

function resolveField(fields, candidates) {
  for (const name of candidates) {
    const value = fields[name];

    if (value && value.trim() !== "") {
      return value.trim();
    }
  }

  return null;
}
Part C: The Server-Side API Route (app/api/pages/route.ts)
This is the security layer of the app. All GraphQL calls to SitecoreAI go through a Next.js server-side API route, never from the browser. This keeps the SITECORE_API_KEY off the client.
// app/api/pages/route.ts

import { NextResponse } from "next/server";
import { fetchPagesFromXMCloud, getDemoPageData } from "@/lib/sitecoreApi";

export async function GET(request: Request) {
  const { searchParams } = new URL(request.url);

  const siteName = searchParams.get("site") || process.env.NEXT_PUBLIC_SITE_NAME;
  const apiKey   = process.env.SITECORE_API_KEY || "";

  // No key configured — return demo data with a clear reason

  if (!apiKey || apiKey.startsWith("your-")) {
    return NextResponse.json({
      source: "demo",
      reason: "No SITECORE_API_KEY configured",
      pages: getDemoPageData(),
    });
  }

  const pages = await fetchPagesFromXMCloud(apiKey, siteName, language);
  const isDemo = pages.some(p => p.pageId.startsWith("demo-"));

  return NextResponse.json({
    source: isDemo ? "demo" : "sitecore",
    pages,
  });
}
Part D: The Three Extension Point Pages
Each extension point is a separate Next.js page. All three call the same /api/pages route to get their data:
| Page File | Extension Point | Key Feature |
|---|---|---|
| app/standalone/page.tsx | Full Screen / Standalone | Bar chart, searchable paginated table of all pages, grade filters, per-page radar detail popup |
| app/dashboard-widget/page.tsx | Dashboard Widget (SitecoreAI) | Overview tab (KPIs, grade distribution, top issues) + Pages tab (search, filter, pagination) |
| app/pages-context-panel/page.tsx | Page Context Panel (Page Builder) | Auto-detects open page via sc_itemid URL param + postMessage. Shows single page health score. |
Auto-Detecting the Current Page in the Context Panel
When the context panel opens in Page Builder, Sitecore passes the current page context via URL parameters:
// app/pages-context-panel/page.tsx

useEffect(() => {
  // Method 1: Read sc_itemid from URL params (most reliable)

  const params   = new URLSearchParams(window.location.search);
  const scItemId = params.get("sc_itemid") || params.get("itemId");

  // Method 2: Extract from document.referrer (Page Builder URL)

  if (!scItemId && document.referrer) {
    const refParams = new URLSearchParams(new URL(document.referrer).search);
    scItemId = refParams.get("sc_itemid");
  }

  // Method 3: Listen for postMessage from Sitecore SDK

  window.addEventListener("message", (event) => {
    if (!event.origin.includes("sitecorecloud.io")) return;

    const msgItemId = event.data?.itemId || event.data?.sc_itemid;

    if (msgItemId) {
      matchAndDisplayPage(msgItemId);
    }
  });

  // Match by item ID against fetched pages

  if (scItemId) {
    const normalizeId = (s) => s.replace(/[{}-]/g, "").toLowerCase();

    const match = scored.find(
      p => normalizeId(p.pageId) === normalizeId(scItemId)
    );

    if (match) {
      setResult(match);
    }
  }
}, []);
Screenshots - App in Action
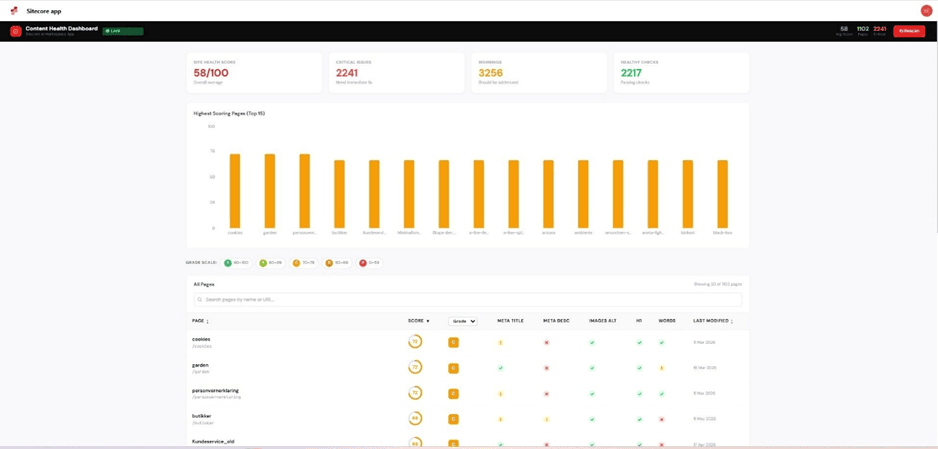
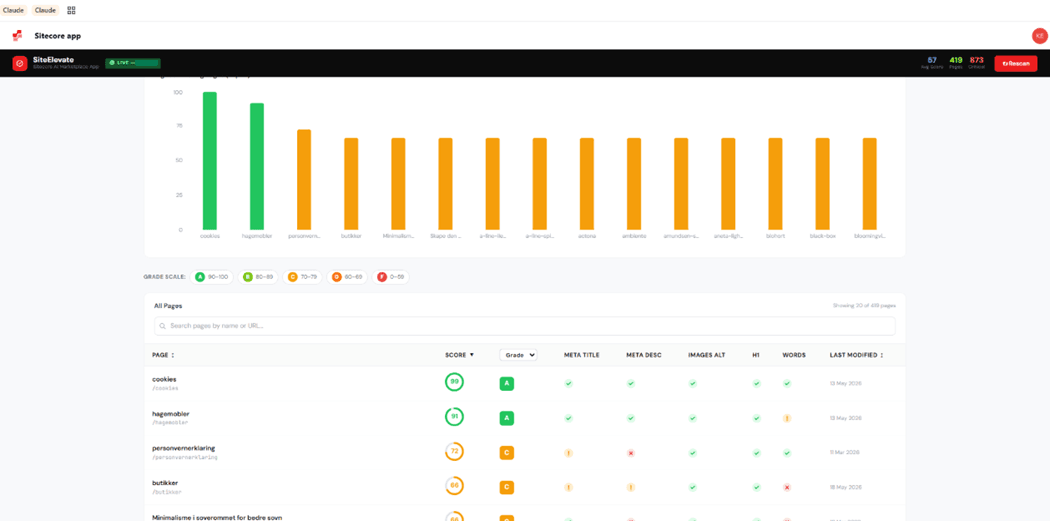
Standalone Full Dashboard
The standalone page provides a complete site audit. Search any page by name or URL, filter by grade, sort by score or date, and click any row to open the per-page detail popup.
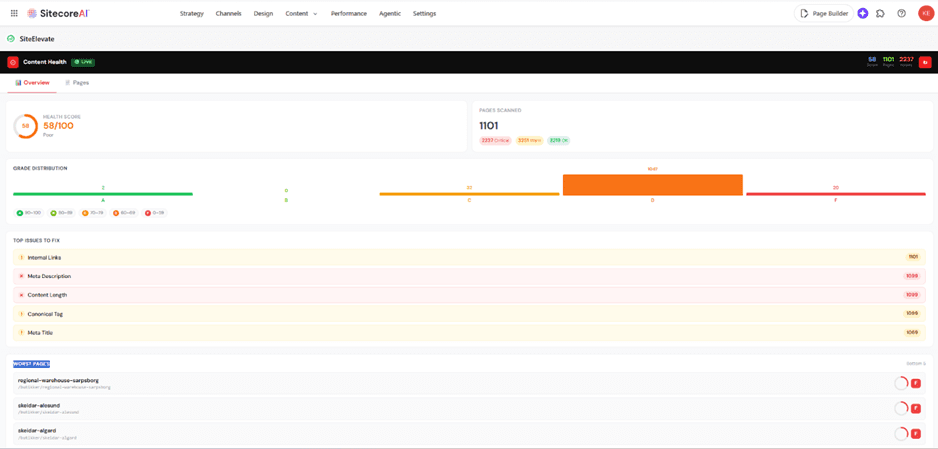
Dashboard Widget - Overview Tab
The Overview tab in the Dashboard Widget shows the site health score, grade distribution bar chart, top issues to fix, and worst-performing pages - all visible on the SitecoreAI home dashboard.
Dashboard Widget - Pages Tab
Switch to the Pages tab to browse all pages with search, filter pills (All / Critical / Warnings / Healthy), and per-page cards showing all 7 health check badges and score rings. Pagination handles 15 pages per screen.

Page Context Panel - Inside Page Builder
When an editor opens any page in SitecoreAI Page Builder, the Content Health panel appears automatically in the left sidebar. It reads the sc_itemid parameter from the URL and shows that specific page's health score and check breakdown.

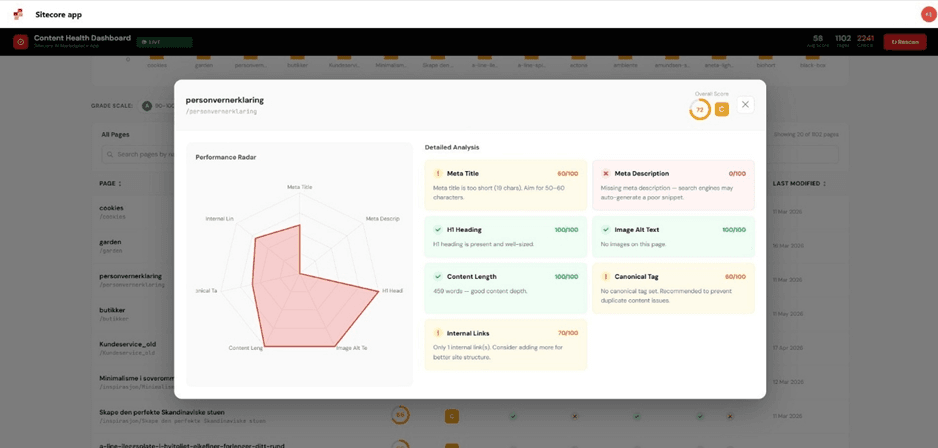
Per-Page Radar Chart and Detailed Analysis
Clicking any page in the dashboard opens a detail popup with two views side by side: a Performance Radar chart showing relative scores across all 7 checks, and a Detailed Analysis grid with exact scores and plain-English fix instructions.
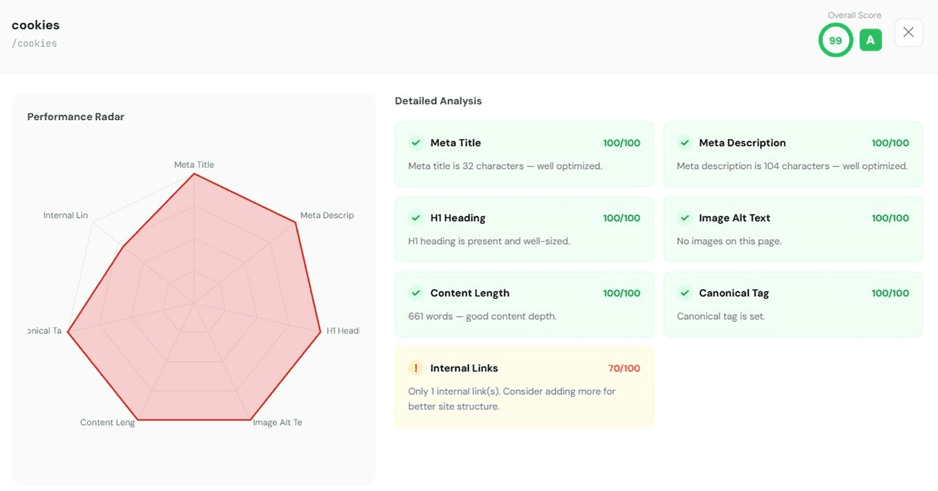
After fixing the identified issues, the radar chart fills out and the score improves significantly:
Deployment
Step 1: Push to GitHub
git init
git add .
git commit -m "feat: SiteElevate — Content Health Dashboard"
git remote add origin https://github.com/YOUR_USERNAME/siteelevate.git
git push -u origin main
Step 2: Deploy on Vercel
1. Go to vercel.com → Add New Project → Import your GitHub repo
2. Framework preset: Next.js (auto-detected)
3. Add these Environment Variables:
| NEXT_PUBLIC_SITECORE_GRAPHQL_ENDPOINT | https://xmc-YOURENV.sitecorecloud.io/sitecore/api/authoring/graphql/v1 |
| NEXT_PUBLIC_SITE_NAME | YourSiteName (exactly as shown in SitecoreAI Sites dashboard) |
| NEXT_PUBLIC_LANGUAGE | en |
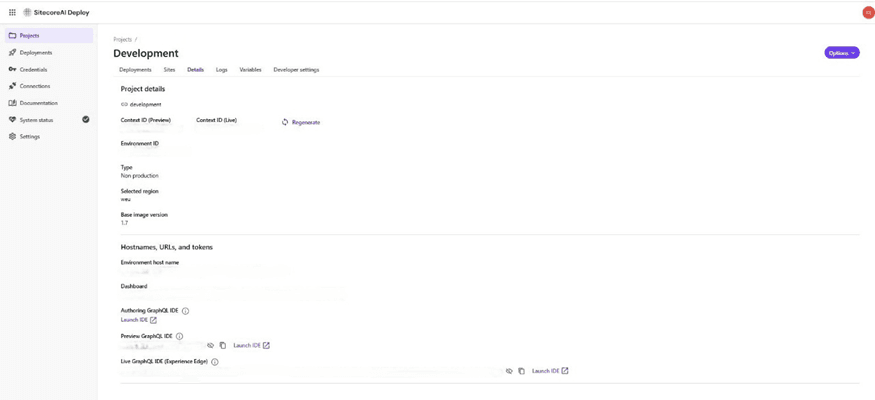
| SITECORE_API_KEY | Your Preview GraphQL API key from SitecoreAI Deploy → Environment → Details |
4. Click Deploy. Note your Vercel URL: https://siteelevate-xxx.vercel.app
Sitecore AI Side - Registering in App Studio
After deploying your app to Vercel, register it in the Sitecore AI portal so it appears inside XM Cloud.
Step 1: Create the App
5. In the Sitecore AI XM Cloud Portal, click App Studio from the left-hand menu
6. Click Create App
7. Enter the App Name: SiteElevate
8. Select Custom - the app will be available only within the current organisation
9. Click Create
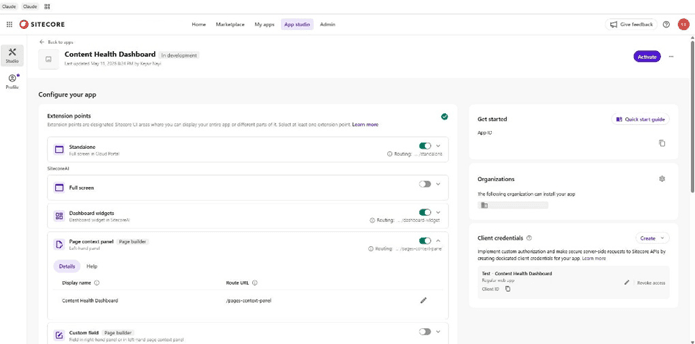
Step 2: Configure Extension Points
Extension points define where your app appears inside the Sitecore AI UI. Enable the toggle for each extension point and enter its route URL:
| Extension Point | Toggle Location | Route URL |
|---|---|---|
| Standalone | Cloud Portal section | https://your-app.vercel.app/standalone |
| Full screen (SitecoreAI) | SitecoreAI section | https://your-app.vercel.app/dashboard-widget |
| Dashboard widgets | SitecoreAI section | https://your-app.vercel.app/dashboard-widget |
| Page context panel | SitecoreAI → Page Builder | https://your-app.vercel.app/pages-context-panel |
Step 3: Configure Client Credentials
10. Under Client Credentials, click Create
11. Choose Regular web app (Next.js is server-rendered, not SPA)
12. Fill in Redirect URIs: https://your-app.vercel.app/api/auth/callback
13. Click Create credentials, COPY the Client ID and Client Secret immediately (shown once only)
Step 4: Configure API Access
14. Scroll to the API Access section
15. Click Edit selection
16. Select SitecoreAI APIs and XM Cloud APIs
17. Save the selection
Step 5: Activate the App
18. Review all configured extension points, credentials, and API access
19. Click Activate in the top-right corner
20. The status changes from In Development to Active
21. The app is now available to all members of your organisation

Real World Use Case - Live Results
After connecting to a live SitecoreAI site with over 1,100 pages, the app immediately revealed the true state of the site's content health:
📊 Site Health Score: 58/100 (Grade D - "Poor") ❌ Critical Issues: 2,241 issues found ⚠️ Warnings: 3,256 warnings 📄 Pages Scanned: 1,102 pages across 4 depth levels 🎯 Meta Descriptions: 100% of pages were missing meta descriptions |
Within a single optimisation session, one page was taken from 58/100 (Grade C) to 99/100 (Grade A) by following the exact fix instructions shown in the Detailed Analysis grid, adding a meta description, extending the meta title, and expanding the page content.
Conclusion
Building SiteElevate as a Sitecore AI Marketplace custom app demonstrated that the Marketplace platform is genuinely powerful for internal tooling. Authentication, iframe embedding, and Sitecore context integration are all handled by the SDK, the focus stays on building the feature.
The key technical challenges solved in this project:
- Breadth-first GraphQL traversal to reach child pages at all depth levels
- CSP frame-ancestors headers for correct iframe embedding in Sitecore
- sc_itemid detection for context-aware page health in Page Builder
- Server-side API proxy to keep credentials off the browser
- FIELD_MAP pattern for template-agnostic field resolution
The full source code is available on GitHub. If you build something similar or extend this with additional checks, feel free to open a pull request.

Keyur Nayi- Technical lead - ADDACT
Technical lead - ADDACT
Keyur is a Technical Lead at Addact with 9+ years of experience in enterprise CMS and software engineering. He is certified in Sitecore XM Cloud, OrderCloud, Sitecore 10 .NET, and SitecoreAI CMS for Developers (2025), specializing in scalable, cloud-ready and AI-driven implementations.
His technical stack includes ASP.NET/Core, C#, MVC, jQuery, and Azure/AWS, enabling high-performance, cross-platform digital solutions.