
Implementing Custom Workflows in Sitecore Content Hub: A Step-by-Step Guide
Published: 12 August 2026
Managing digital content is not just about creating assets or documents; it is about ensuring every piece of content follows a structured approval process before it reaches production. Sitecore Content Hub provides State Flows (Workflows) that enable organisations to automate content lifecycle management by defining different stages such as Draft, Review, Approval, Publishing, and Archive. Content Hub includes predefined state flows for common content operations, and administrators can also create custom workflows to meet specific business requirements.
In this article, we will learn how to create a custom workflow in Sitecore Content Hub.
What is a Workflow
Sitecore Content Hub calls its workflow engine a state flow. A state flow moves an entity (content, an asset, a product, etc.) through a series of states, connected by transitions, kicked off by an action, and automatically triggered by a trigger.
Prerequisites
Before opening the State Flow Manager, have these ready:
- Admin access to Content Hub with rights to Manage > State flows, Actions, and Triggers.
- A target entity definition the workflow will apply to (e.g., M.Content for content items, or a custom entity definition for products/assets).
- A schema for that entity with the properties you'll need (status, assignee, approval flags, etc.). If your entity doesn't have fields like "Content status" or "Approved for creation," add them to the schema first.
Components of Workflow
- State Flow: A State Flow is the container of the entire workflow. It contains all workflow states and transitions.
- States: States represent different phases of the content lifecycle ex. Draft, Review, Published.
- Transitions: Transitions define how users move from one state to another.
Steps to Create a Workflow
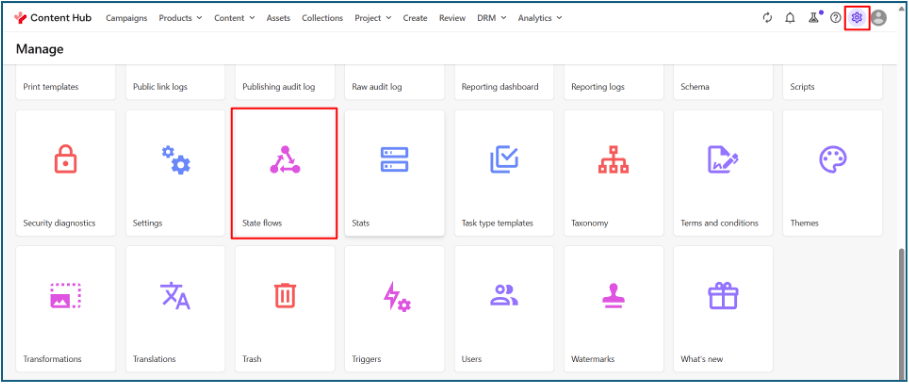
- On the top menu bar, click Manage.
- Select State flows.
- Click State flow (to create a new one).
- In the Target definition dropdown, choose the entity type this workflow governs (e.g., M.Content).
- In Name, give it a clear, descriptive name. e.g., Blog flow.
- Leave Detail page empty for now (you can attach a detail page later if you want the flow visualised there).
- Leave Email template empty for now (you can add it later if you want to add the relevant template (e.g., the CMP template) so state-change notifications are sent using your organisation's standard email format.
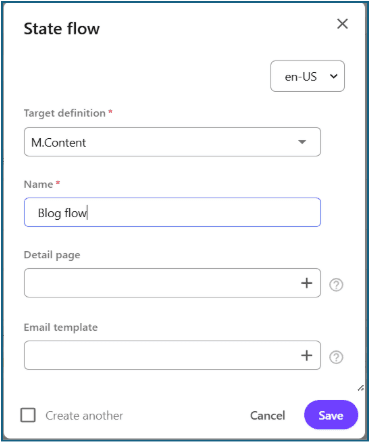
- Click Save.
At this point, you have an empty state flow container no states yet.
Steps to Create the states
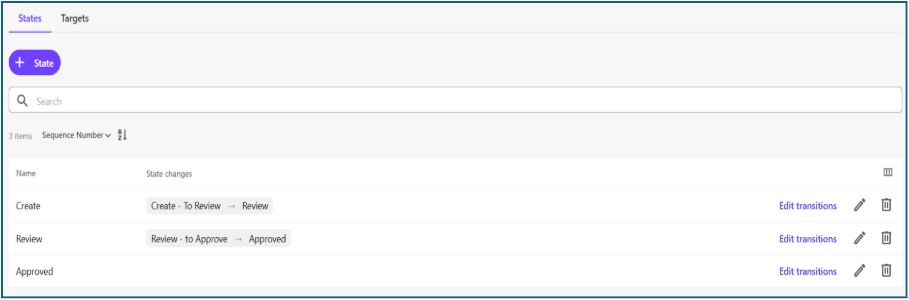
Open your new state flow and add each stage of the lifecycle as a separate state. For a simple three-stage blog approval flow:
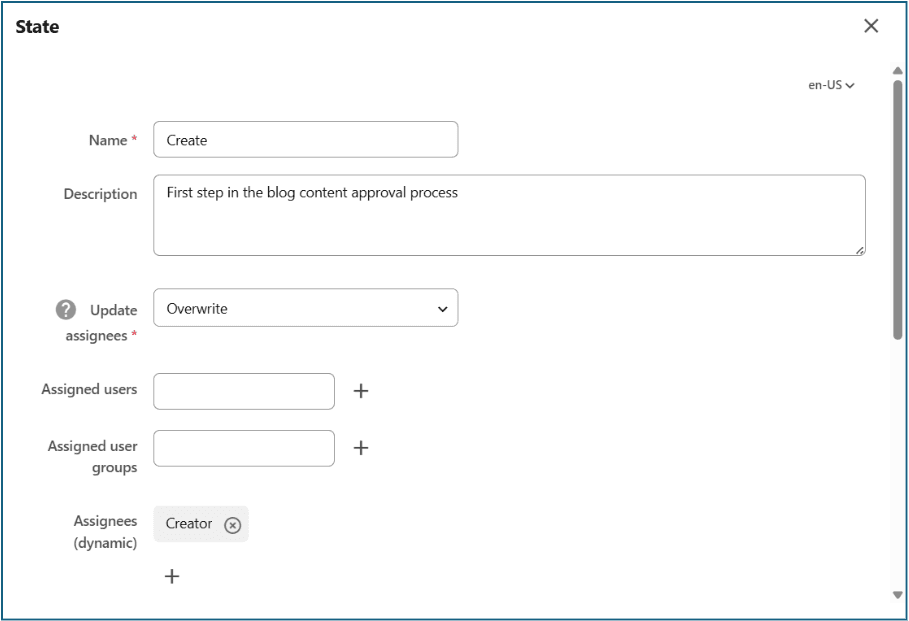
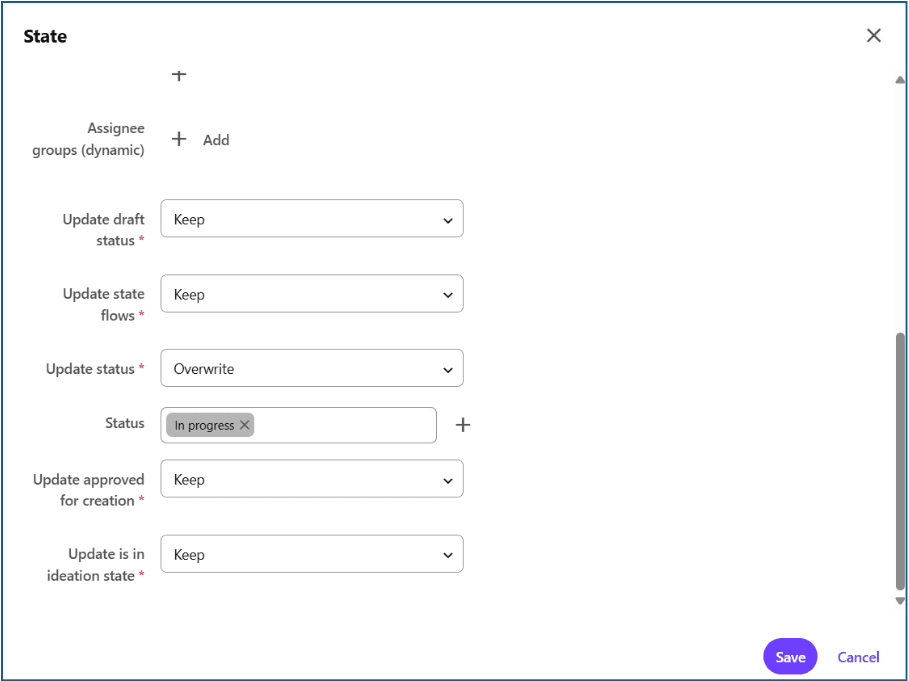
State 1 — Create
- Description: first step in the process (e.g., "First step in the blog content approval process").
- Assignees: the user group responsible for authoring (e.g., Content Creators).
- Update status: set Overwrite and set Status “In Progress”.
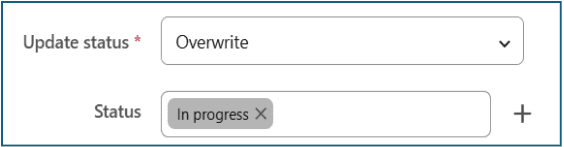
State 2 — Review
- Description: content is being reviewed (e.g., by Reviewer group).
- Assignees: the reviewer/editor user group.
- Update status: set Overwrite and set Status “In Review”.
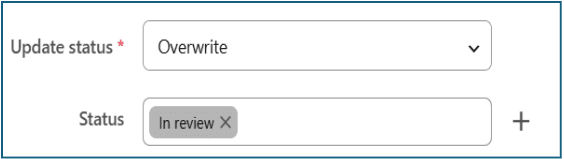
State 3 — Approved
- Description: content has passed review and is ready to publish.
- Assignees: whoever owns publishing.
- Update status: set Overwrite and set Status “Final”.
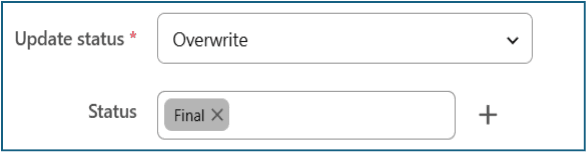
For each state, you configure:
- Assigned user groups: who is responsible while the item sits in this state.
- Status/content-status updates: what value gets written to a status field when the item enters this state.
- Draft / approval / ideation flags: booleans the rest of your schema and triggers can key off.
Connect the states with transitions
Transitions are the arrows between states they define legal moves and what triggers each move.
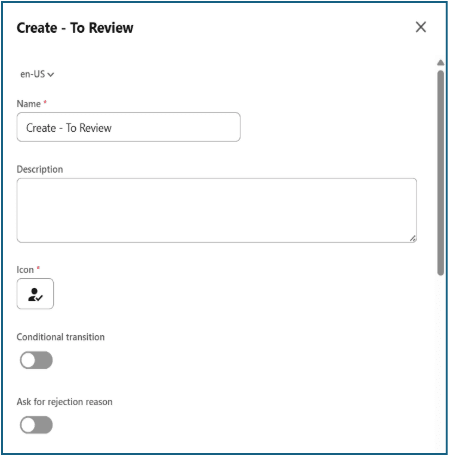
- Next to the Create state, click Edit transitions.
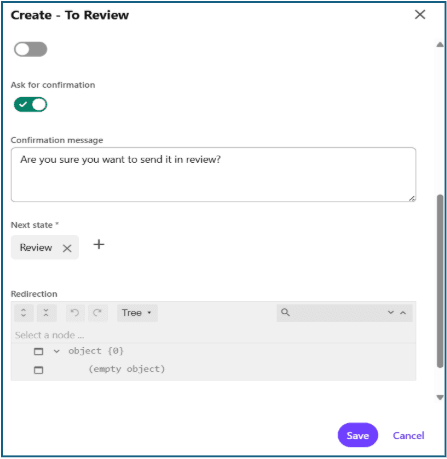
- Add a transition (e.g., named "Creation") whose next state is Review.
- Repeat: from Review, add a transition to Approved.
For more complex workflows, you can add branching transitions e.g., a "Reject" transition from Review back to Create making the flow non-linear.
Create an action to start the state flow
A state flow doesn't run on its own something has to kick it off. That "something" is an action.
1. Go to Manage > Actions.
2. Click New action.
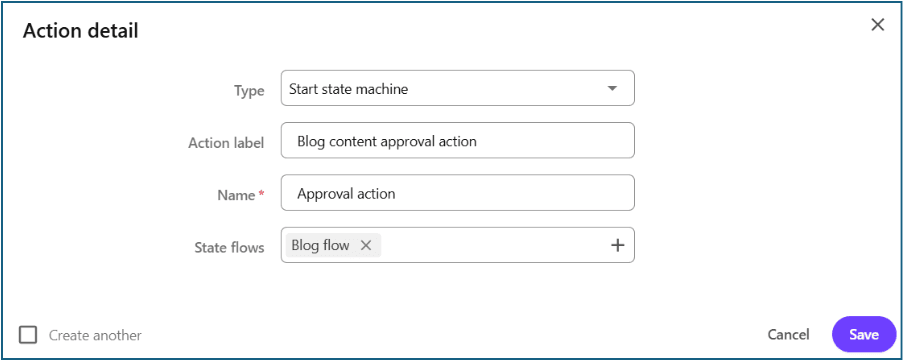
3. Fill in:
- Name — e.g., Approval action.
- Label — a description, e.g., Blog content approval action.
- Type — select Start state machine.
- State flow — pick the state flow you just built (Blog flow).
4. Click Save.
Create a trigger to fire the action automatically
Triggers listen for events (entity created, entity modified, etc.) and, when conditions match, fire an action.
- Go to Manage > Triggers, then click New trigger.
- On the General tab:
- Name — e.g., Blog content approval trigger.
- Description — e.g., Automatically starts the blog flow.
- Objective — check Entity creation and Entity modification.
- Execution type — In process.
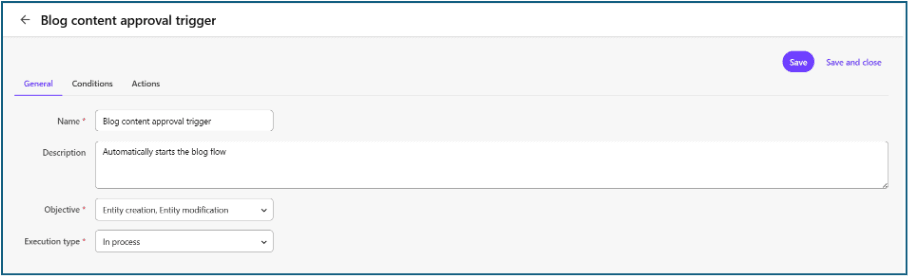
3. On the Conditions tab:
- Add a definition for the relevant entity (e.g., Content (M.Content)).
- Add a condition such as Approved for creation = true.
- Add a second condition to scope the trigger to the right content type, e.g., Type contains "Blog".
- Combine conditions with AND so both must be true.
- Save, then Activate the trigger.
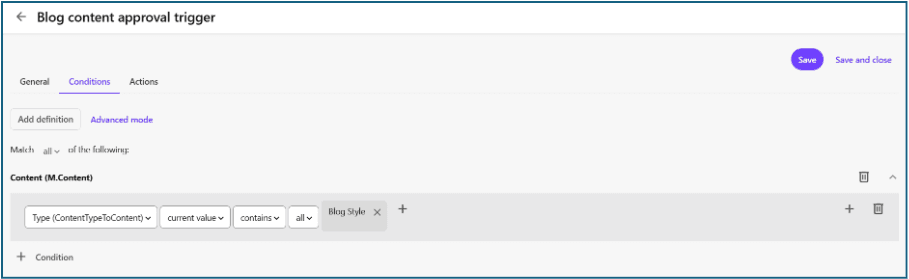
4. On the Actions tab:
- Under Post actions, add the action you created in Step 4 (Blog content approval action).
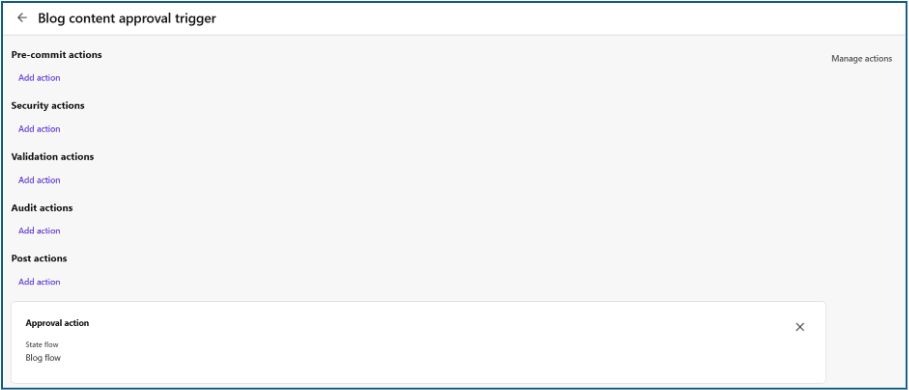
5. Save and close.
Scope out conflicting default workflow triggers
Content Hub ships with default triggers (e.g., a generic content-approval trigger) that may also match your new content type. If you don't exclude your new type from the default trigger, both workflows could fire.
- Find the relevant default trigger (e.g., CMP - Content approval trigger).
- Open it and go to Conditions.
- Add a condition that excludes your new type, e.g., Type does not contain "Blog style".
- Save.
This keeps the default flow governing everything else while your new custom flow handles the new content type exclusively
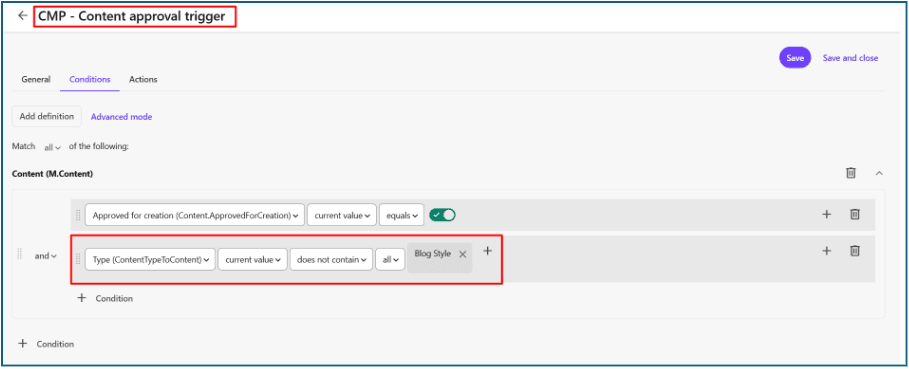
Test end-to-end
- Create a test content item of the relevant type.
- Confirm it lands in the Create state automatically (trigger fired correctly).
- Move it through Review and Approved, checking at each step:
- Correct user group is assigned.
- Status field updates as expected.
- Permissions are respected (only the assigned group can act).
Benefits of Using Workflows
- Standardises the content approval lifecycle.
- Improves collaboration across authors, reviewers, and publishers.
- Enforces governance through role-based access and mandatory validations.
- Supports automation such as notifications, scripts, and integrations.
- Reduces publishing errors and improves content quality.
Conclusion
Sitecore Content Hub workflows (State Flows) are a powerful mechanism for governing content throughout its lifecycle. By combining configurable states, transitions, permissions, validations, and automation, organisations can build reliable content approval processes that align with business requirements. Whether you're managing articles, digital assets, product content, or marketing campaigns, a well-designed workflow improves collaboration, enforces consistency, and ensures that only approved content reaches publication.
FAQs
1.What is a workflow in Sitecore Content Hub?
Ans: In Sitecore Content Hub, a workflow technically called a State Flow is a configurable process that moves content, assets, or products through defined stages (such as Draft, Review, Approval, and Publish) using states, transitions, actions, and triggers. It automates and governs the content lifecycle from creation to publication.
2. Can you create a custom workflow in Sitecore Content Hub?
Ans: Yes. While Content Hub ships with predefined state flows for common operations, administrators with Manage rights over State Flows, Actions, and Triggers can build fully custom workflows tailored to specific content types, approval hierarchies, or business rules.
3. What permissions are required to build a custom state flow?
Ans: You need admin access to Content Hub with rights to Manage > State Flows, Actions, and Triggers, along with schema edit permissions on the target entity definition if new fields (like a status or approval flag) need to be added.
4. How do you automatically start a workflow when content is created?
Ans: By creating a trigger scoped to the relevant entity and content type (using conditions such as "Entity creation" plus a type of filter) and linking it to an action of type "Start state machine" that points to your custom state flow.
5. Can a Content Hub workflow support branching or rejection paths?
Ans: Yes. Transitions aren't limited to a linear path you can add a "Reject" transition from a Review state back to Create (or any prior state), enabling non-linear, real-world approval flows.
6. Why would a custom workflow conflict with Content Hub's default triggers?
Ans: Content Hub's built-in triggers (e.g., a generic content-approval trigger) may match the same entity type as your new workflow, causing both to fire. This is resolved by adding an exclusion condition to the default trigger, so it skips your new content type.

Mitesh Patel || Chief Technology Officer (CTO) | ADDACT
Sitecore AI Certified || XMCloud || OrderCloud Certified
Mitesh Patel is the Chief Technology Officer (CTO) at Addact with 12+ years of experience in enterprise CMS, digital experience platforms, and cloud-native application development. He specializes in Sitecore, Contentful, Strapi, Kentico, Umbraco, Contentstack, and .NET, helping organizations build scalable, secure, and future-ready digital solutions through modern CMS, headless architectures, AI-driven experiences, and cloud technologies.