Content Hub (DAM & CMP) to Sitecore CMS Connection: A Step-by-Step Guide
Published: 30 March 2026
Introduction
Sitecore Content Hub is not just one tool; it is a suite. When we say, "Connect Content Hub," we usually mean two distinct integrations:
DAM (Digital Asset Management) Integration:
- What it does: Replaces the native Sitecore Media Library. Instead of uploading images to Sitecore, authors click "Browse Sitecore DAM" and pick assets directly from Content Hub.
- Benefit: "Single Source of Truth." No more duplicate images or outdated logos. If you update an asset in the Hub, it updates everywhere.
CMP (Content Marketing Platform) Integration:
- What it does: Content (articles, blogs, recipes) is authored in Content Hub first (collaboratively), then automatically "pushed" into Sitecore to create items.
- Benefit: Separates content creation from presentation. Marketing teams can work on strategy and copy in the Hub without needing Sitecore access.
Prerequisites & Compatibility
Sitecore XP/SXA Version: Sitecore 10.0+ is recommended for the smoothest integration (specifically 10.1+ for better DAM/CMP support).
Content Hub Access: Admin access to the Content Hub instance.
Azure Service Bus (Critical for CMP): You cannot do CMP integration without an Azure Service Bus. It acts as the messenger passing data from the Hub to XP.
License: Proper licensing for Content Hub, CMP, DAM, and SCCH
Network: Firewall rules must allow Sitecore to talk to Content Hub and Azure Service Bus.
Packages: Sitecore Connect for Content Hub 4.x/5.x (SIF + WDP packages) Sitecore Developer Portal+1
Step-by-Step Configuration Guide
This section is divided into Content Hub Side (Configuration) and Sitecore XP Side (Installation).
Phase A: Configure Sitecore Content Hub
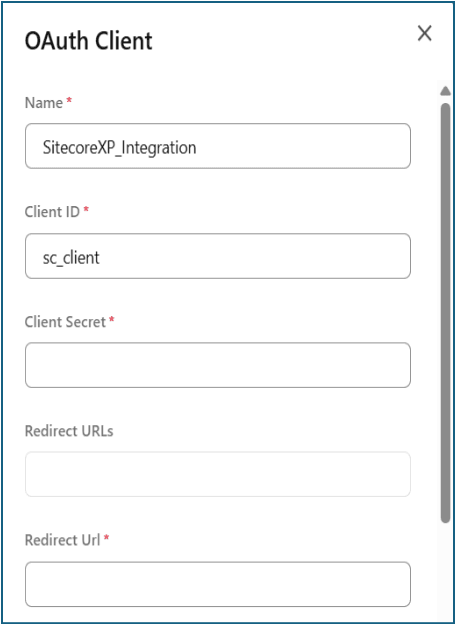
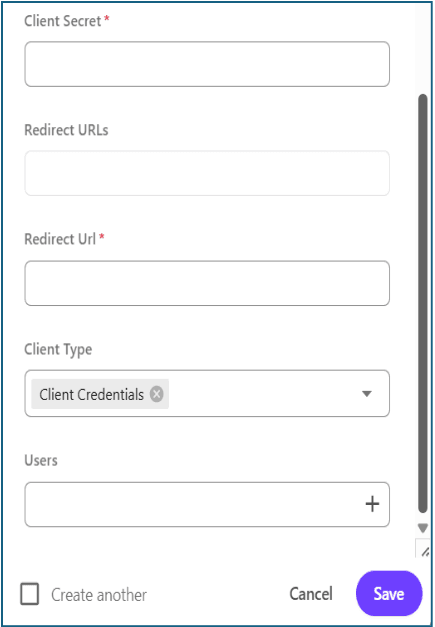
Step 1: Create an OAuth Client
Sitecore XP needs a "key" to talk to Content Hub.
- Log in to Content Hub as Superuser.
- Go to Manage > OAuth Clients.
- Click > Client.
- Name: SitecoreXP_Integration
- Client Id: (Auto-generated or set manually, e.g., sc_client)
- Client Secret: (Copy this! We will need it later.)
- Redirect URI: https://<YOUR_SITECORE_CM_URL>/sitecore/admin/oauth/service/callback
4. Save.
Step 2: Create Action for Azure bus services
- Go to Manage > Actions
- Click +Action
- Type: M Azure Service Bus
- Action label: name of your action that the user can see on the list
- Name: name of your action that will be mapped with the trigger
- Destination type: Topic
- Hub in: set by default, we can't change it (save it, we need it in the connection string)
- Hub out: set by default, we can't change it (save it, we need it in the connection string)

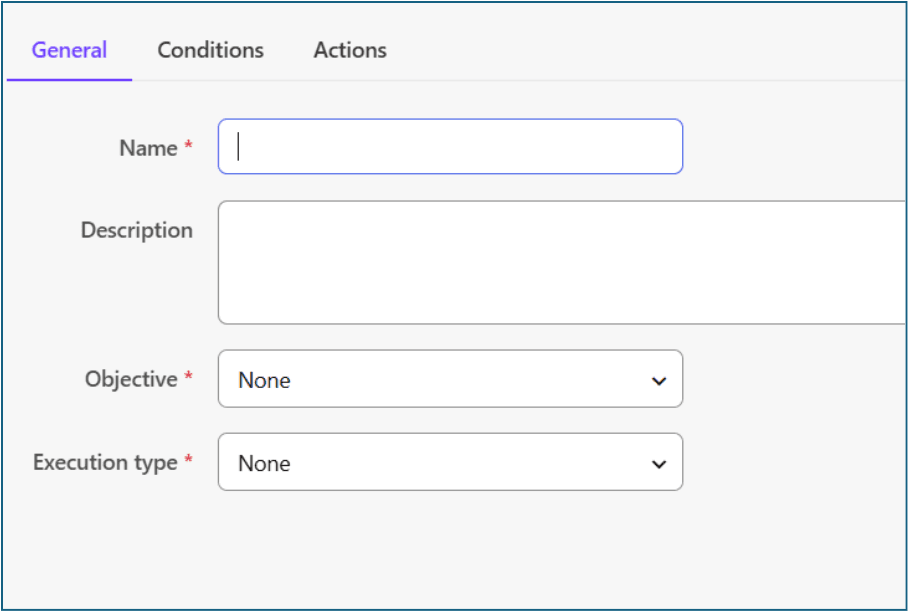
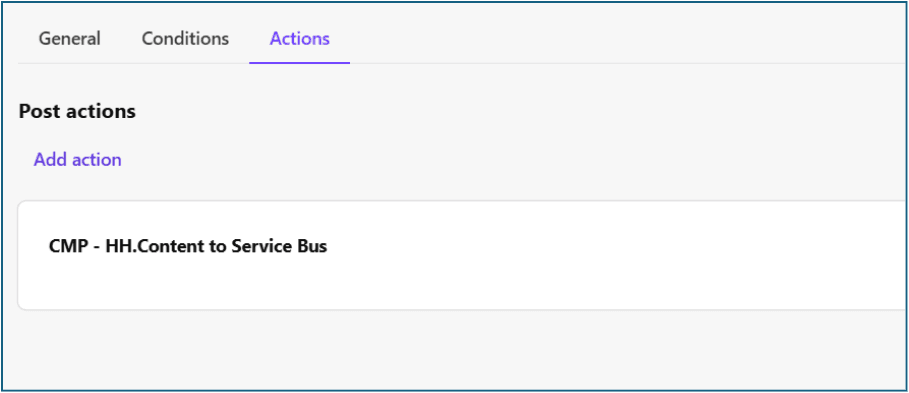
Step 3: Create a Trigger
- Go to Manage > Triggers
- Click +Trigger
- In which we can see three tabs: General, Conditions, Actions
- In the general tab
- Name: give your trigger name
- Description: give a short description about what this trigger does
- Objective: check Entity creation, Entity modification
- Execution type: select In background
5. In the Conditions tab, add a condition as per the requirement
6. In the Actions tab, in the post action section, select our created Azure bus service action
Step 4: Configure CORS (Cross-Origin Resource Sharing)
- This allows the Content Hub pop-up window (iframe) to load inside your Sitecore CMS.
- Go to Manage > Settings.
- Navigate to PortalConfiguration > CORSConfiguration.
- Add your Sitecore CM (Content Management) URL (e.g., https://cm.mysite.com).
- Save.

Phase B: Configure Sitecore XP / XM
Step 1: Install the Connector Module
- Download Sitecore Connect for Content Hub from the Sitecore Downloads page.
- Install it via the Sitecore Installation Wizard (/sitecore/admin/UpdateInstallationWizard.aspx) or using Sitecore CLI/Docker if you are on a modern setup.
Step 2: Configure Connection Strings
Go to your Sitecore App_Config/ConnectionStrings.config
<add name="DAM.ContentHub" connectionString="ClientId=<CLIENT_ID>;ClientSecret=<CLIENT_SECRET>;UserName=<USER>;Password=<PASS>;URI=https://<YOUR_HUB_URL>;" />
<add name="CMP.ContentHub" connectionString="ClientId=<CLIENT_ID>;ClientSecret=<CLIENT_SECRET>;UserName=<USER>;Password=<PASS>;URI=https://<YOUR_HUB_URL>;" />
<add name="CMP.ServiceBusSubscription" connectionString="hub_out_subscription"/>
<add name="DAM.SearchPage" connectionString="https://<YOUR_HUB_URL>/en-us/sitecore-dam-connect/approved-assets"/>
<add name="DAM.ExternalRedirectKey" connectionString="Sitecore"/>
<add name="CMP.ServiceBusEntityPathIn" connectionString="<Hub out value which we saved earlier in Contenthub action"/>
<add name="CMP.ServiceBusEntityPathOut" connectionString="Hub in value which we saved earlier in Contenthub action"/>
Note: Very important “PathIn” has “Hub out” value and “PathOut” has “Hub in” value
Enable CMP and/or DAM
- Open web.config
Turn on the needed modules using the documented appSettings / config switches (for example, flags that enable CMP or DAM).
<add key="cmpEnabled:define" value="yes"/>
<add key="damEnabled:define" value="yes"/>
- Recycle the IIS app pool.
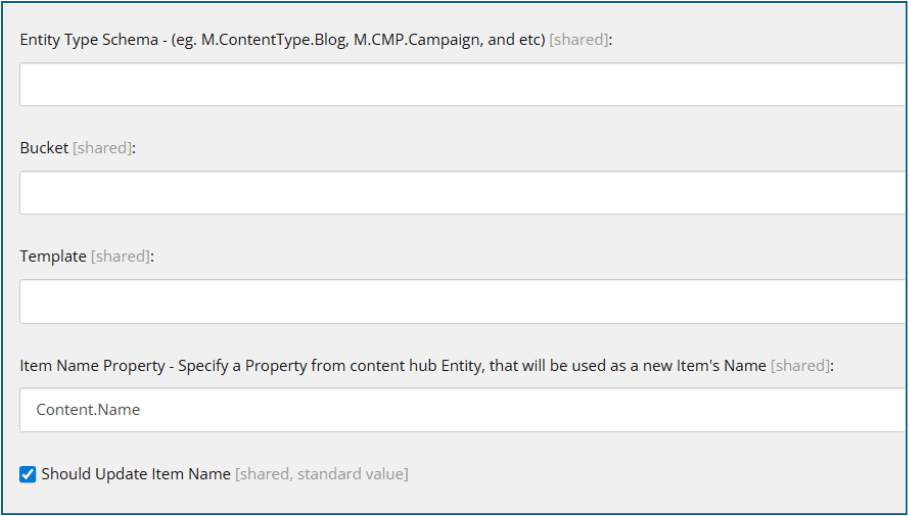
Step 3: Map template and Fields with Contenthub’s Content type
Here, you map Hub JSON Properties (e.g., Title, Body, Author) to Sitecore Item Fields.
Template mapping
- Go to /sitecore/system/Modules/CMP/Config
- Use /sitecore/templates/CMP/Entity Mapping Template
- Put all the details
Entity Type Schema: your content type from contenthub.
(e.g. M.ContentType.<your content type name>)
- Bucket: give the root path where it should create the item.
- Template: select your Sitecore template that is used to create the item
- Item Name Property: it will create the item based on the selected content type item field. (e.g. Content.Name)
- Should Update Item Name: if this checkbox is checked, then in Contenthub, the given field value is changed, and then the item name in Sitecore will be changed
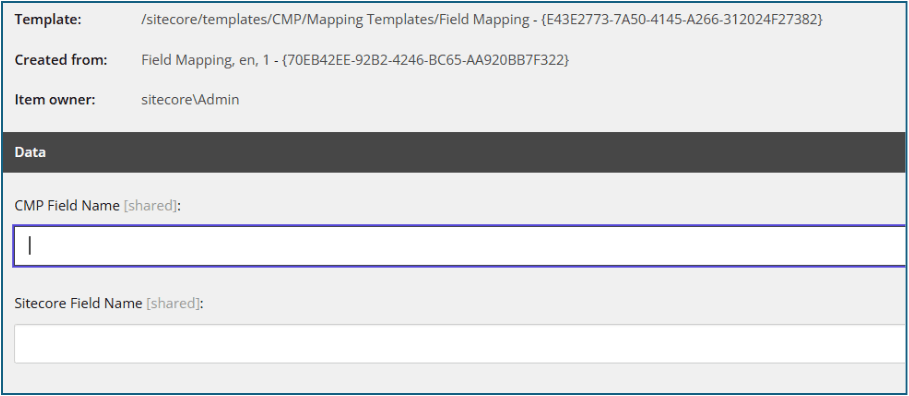
Field mapping
- Right-click on your newly created template mapping item > Insert > Field Mapping
- Fill in the details in the fields
- CMP Field Name: Name of your field from the content hub
- Sitecore Field Name: select the field in which data will be stored.
(e.g. Templates/Feature/_Title/Content/Title)
Troubleshooting & Common Issues
- The "Refused to Connect" Error (Iframe):
Cause: CORS is not configured correctly in Content Hub.
Fix: Check Phase A, Step 4. Ensure no trailing slashes or typos in the URL.
- Empty Asset Window:
Cause: The user in the Connection String doesn't have permission to view assets.
Fix: Log in to Hub as that user and verify they can see assets.
- CMP Content Not Appearing:
Cause: Azure Service Bus is blocked, or the "Entity Identifier" mapping is wrong.
Fix: Check Sitecore Logs (App_Data/logs) for "Azure Service Bus" errors.
Conclusion
Connecting Sitecore XP to Content Hub bridges the gap between creative marketing and web delivery. While the setup requires careful attention to CORS and Azure Service Bus, the result is a seamless workflow where "Content is King" and "Context is Queen."

Mitesh Patel - Technical Head - ADDACT
Sitecore || XMCloud || OrderCloud Certified
Mitesh, a distinguished Technical Head at Addact/Addxp, is a prominent figure in Sitecore/XMCloud/OrderCloud certified writing. From Sitecore XM Cloud Developer Certification to Sitecore 10 .NET Developer Certification and Sitecore OrderCloud Certification, Mitesh's expertise is unparalleled. Mitesh is not only a skilled Sitecore CMS developer but also a 12+ years experienced software engineer proficient in various technologies such as MVC, ASP.Net, C#, jQuery, and Azure cloud/AWS.