Building a Sitecore AI Marketplace Color Picker App
Published: 18 February 2026

Before getting started - What is the Sitecore Marketplace?
The Sitecore Marketplace lets customers, partners, and developers extend Sitecore by building custom applications. These apps plug directly into Sitecore XM Cloud using supported extension points, making it easy to add tailored functionality where it’s needed.
Marketplace apps can be:
Private – available only within your organization
Public – available in the public marketplace
Introduction
Goal: Explain that you wanted to build a custom field editor (or app) for SitecoreAI XM Cloud / Marketplace that allows users to pick a color visually.
Problem: Earlier, content editors had to manually copy HEX codes from external sources and paste them into a single-line field in Page Builder to set text background colors.
Solution: We built a React app using react-color embedded via the Marketplace SDK that lets editors directly pick a color within the field, automatically capturing the HEX code instantly.
General Prerequisites
Before getting started, make sure you have:
- Access to the Sitecore Cloud Portal
Marketplace apps are currently limited to Organization Owners and Admins. - A Development Setup
Node.js 16+ and npm 10+ installed. - Basic Web Development Knowledge
Familiarity with TypeScript and Next.JS is enough to follow along.
Tech Stack (Libraries Used)
- Vite: For fast project setup and building (npm create vite@latest).
- Next.JS: The UI library.
- Tailwind CSS: For beautiful, rapid styling (@tailwindcss/vite).
- @SitecoreAI-marketplace-sdk/client: The crucial bridge to communicate with Sitecore AI.
- react-color: The library that provides the pre-built Chrome Picker.
- lucide-react: For icons (if used in other parts or mention it as a standard choice).
Getting Started (Setup)
Briefly list the commands you ran:
- Initialize project: npm create vite@latest marketplace-icon-picker -- --template react-ts
Install dependencies:

- Setup Tailwind CSS.
The "Main" Code (Screenshots & Explainers)
Part A:
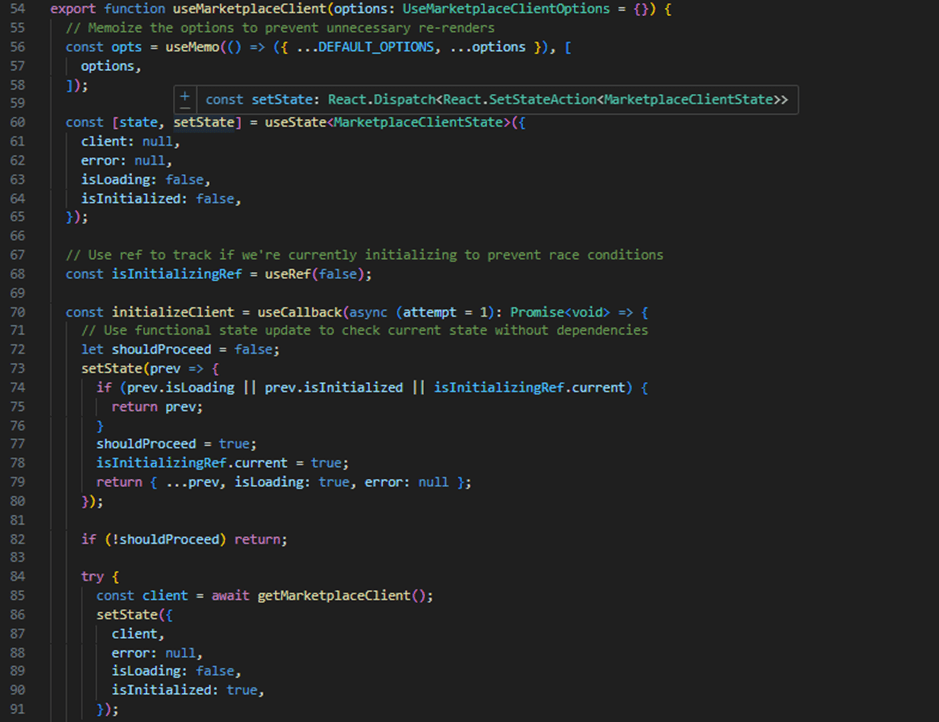
Custom Hook ( src/utils/hooks/useMarketplaceClient.ts ) Explain that valid communication with SitecoreAI is complex, so you wrapped it in a hook.
Key Points to Highlight:
• It handles the ClientSDK.init() handshake.
• It manages loading states (isLoading, isInitialized).
• It has retry logic in case the connection is slow.
Part B:
The UI ( src/components/ui/ColorPicker.tsx ) Explain how you made it look good.
Key Points to Highlight:
• Using ChromePicker from react-color.
• Using Tailwind classes for the layout (centering, shadow, rounded corners).
• Dynamic background color changing as you pick (style={{ backgroundColor: color }}).
Part C:
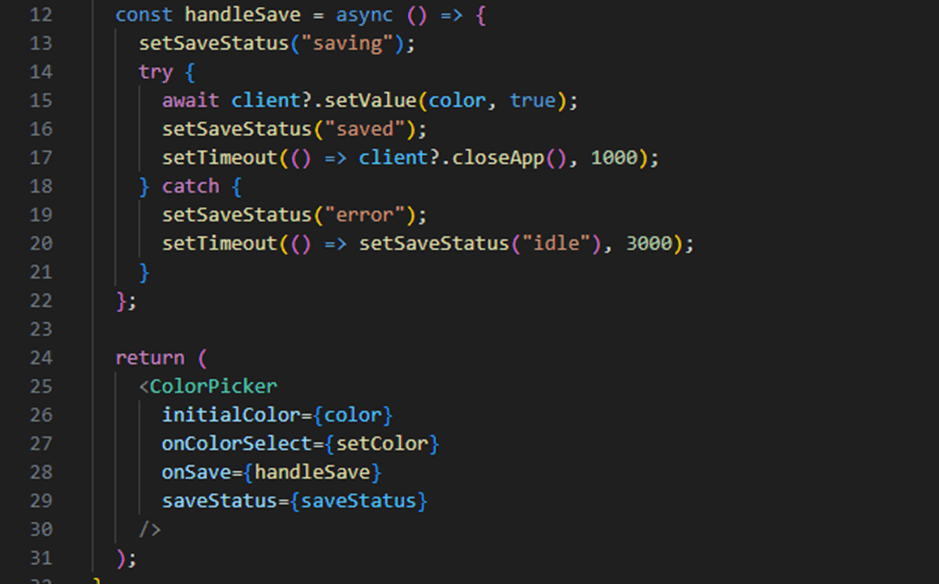
Bringing It Together ( src/App.tsx )
Explain the final logic flow.
Key Points to Highlight:
• Importing the custom hook ( useMarketplaceClient ).
• The handleSave function:
• Calls client.setValue(color). Shows "Saving..." -> "Saved!" feedback.
Closes the app after saving (client.closeApp()).
Deployment / Build
• Mention running npm run build to create the static assets.
• Explain that these assets are what get deployed/uploaded to the Marketplace entry.
• Link to your GitHub repo.
SitecoreAI side:
In the Sitecore AI - XM Cloud Portal, navigate to your project and click on App Studio from the left-hand menu.

After opening App Studio in the SitecoreAI XM Cloud Portal:
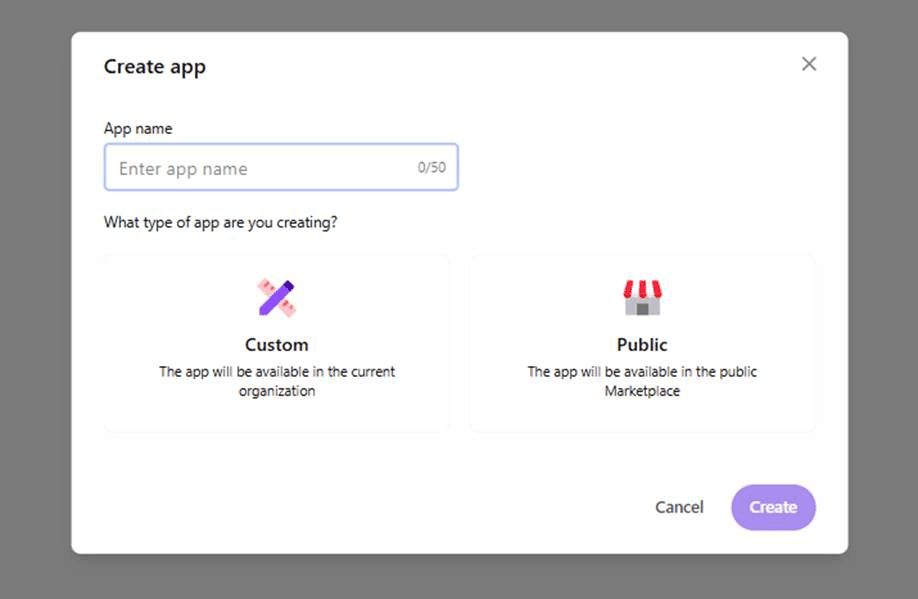
- Click on Create App.
- A popup window will appear with the title “Create App” and a label “In Development”.
- In the popup, enter the App Name in the App name field.
- Next, select What type of app are you creating?
a. Custom – The app will be available only within the current organization.
b. Public – The app will be available in the public Marketplace. - Once all details are filled in, click Create to create the app.
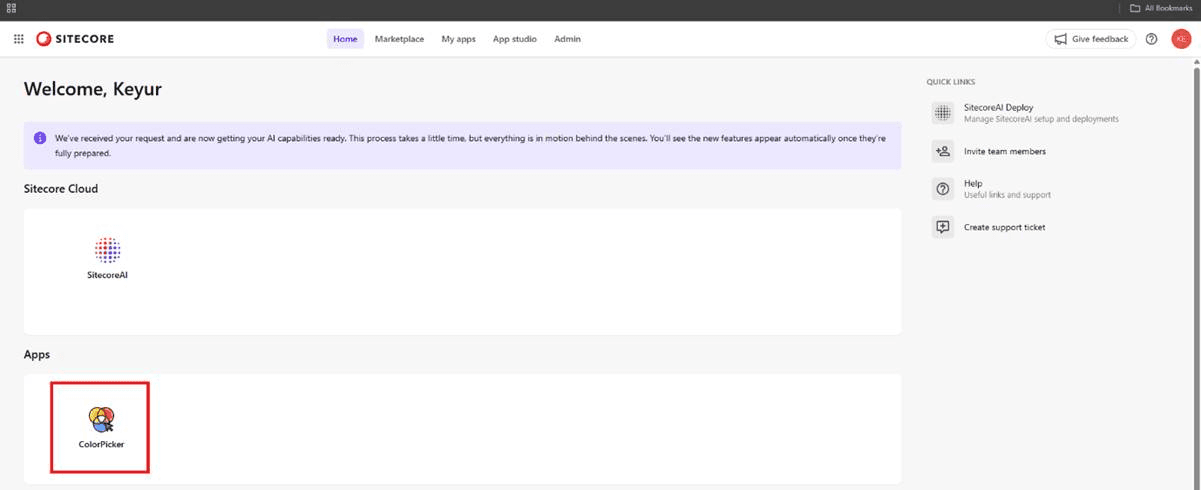
After clicking Create, the app will be successfully created and listed in App Studio.
Configure the App in App Studio (Next Steps)
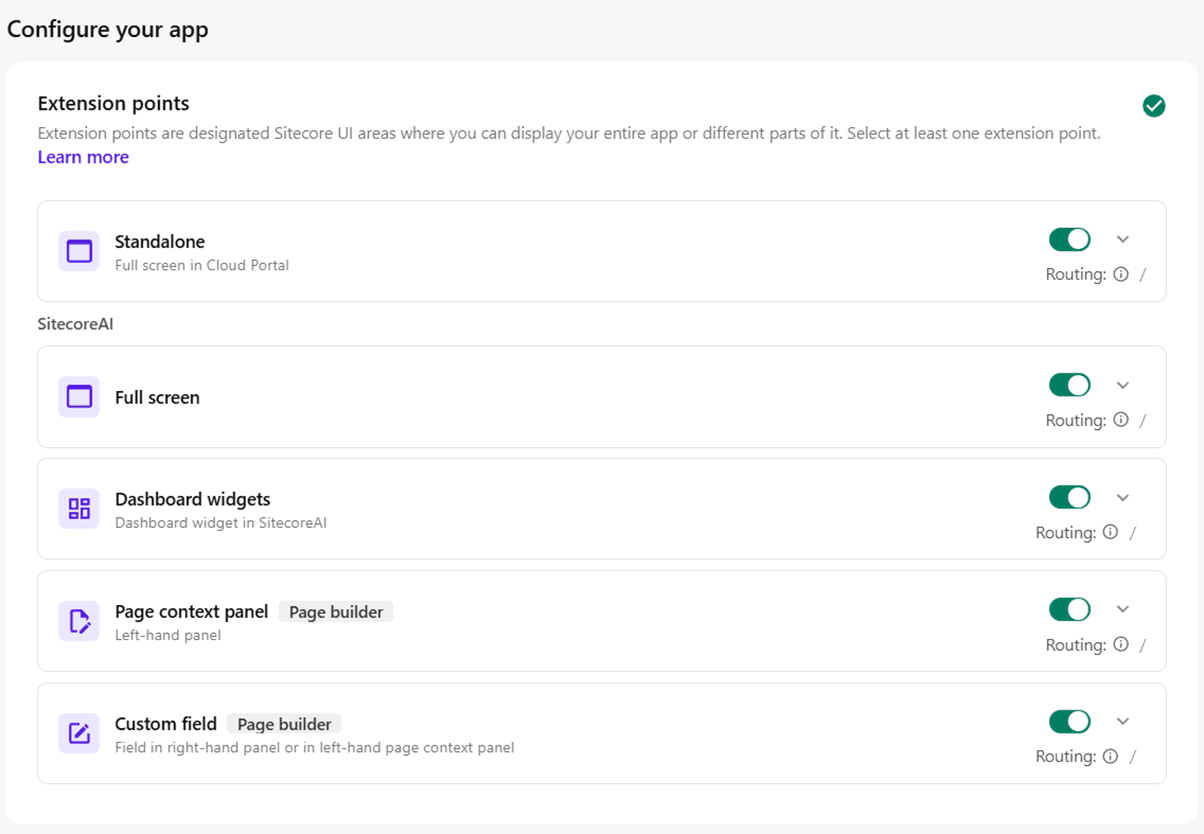
After creating the app, you will be redirected to the App Configuration screen. Here, you need to configure how and where your app will be used in SitecoreAI XM Cloud.
Step 1: Configure Extension Points
Extension points define where your app will appear inside the SitecoreAI UI. You must select at least one extension point.
Available options include:
- Standalone: Displays the app as a full-screen application inside the XM Cloud Portal.
- Full Screen (SitecoreAI): Opens the app in full-screen mode within SitecoreAI.
- Dashboard Widgets: Allows the app to appear as a widget on the SitecoreAI dashboard.
- Page Context Panel (Page Builder): Displays the app in the left-hand panel of the Page Builder.
- Custom Field (Page Builder): Allows the app to be used as a custom field inside the Page Builder
Enable the toggle for the extension point based on your requirement.
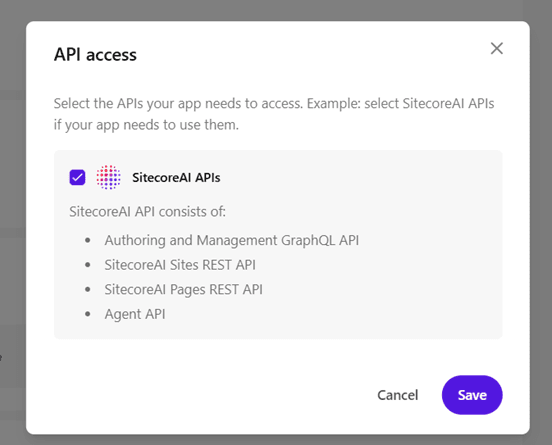
Step 2: Configure API Access
Under API access:
- Click Edit selection
- Select the required SitecoreAI APIs (for example, SitecoreAI APIs)
- Save the selection
This allows your app to securely communicate with SitecoreAI services.
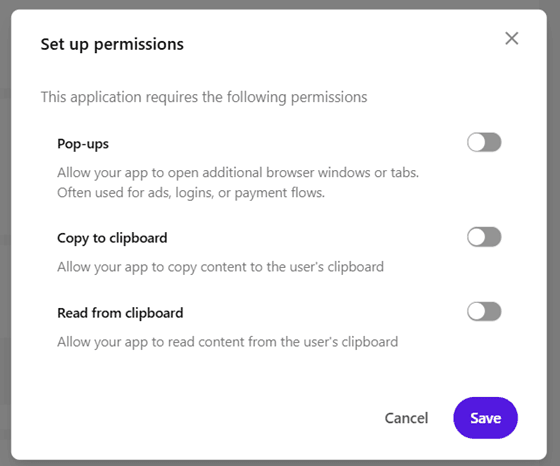
Step 3: Set App Permissions
Under API access:
- Click Select permissions
- Choose the permissions your app needs to function properly
- Save the permissions
This controls what actions your app can perform within SitecoreAI.
Step 4: Add Deployment URL
In the Deployment URL section:
- Enter the public URL where your app is hosted
- This URL is required for the app to load inside SitecoreAI
Example: https://your-app-domain.com

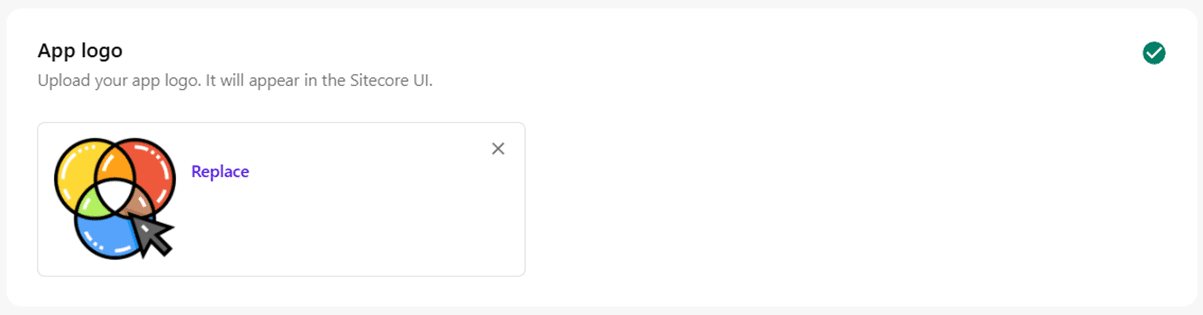
Step 5: Add App Logo
In the App logo section:
- Enter the logo URL of your app
- The logo must be:
a. Minimum 512 × 512 pixels
b. Square
c. Supported formats: .jpg, .jpeg, .png, .svg
This logo will appear inside the SitecoreAI UI.
Step 6: Review Marketplace App ID
On the right-hand panel, you can see:
- Marketplace App ID
- App ID
- Organization access details
These values are auto-generated and used for identification and marketplace installation.
Step 7: Activate the App
Once all required fields are configured:
- Click Activate (top-right corner)
- The app status will change from In Development to Active
- The app will now be available based on the selected extension points
Conclusion
After configuring extension points, API access, permissions, deployment URL, and logo, your app is ready to be activated and used inside SitecoreAI XM Cloud.
This completes the app creation process using App Studio in SitecoreAI XM Cloud.
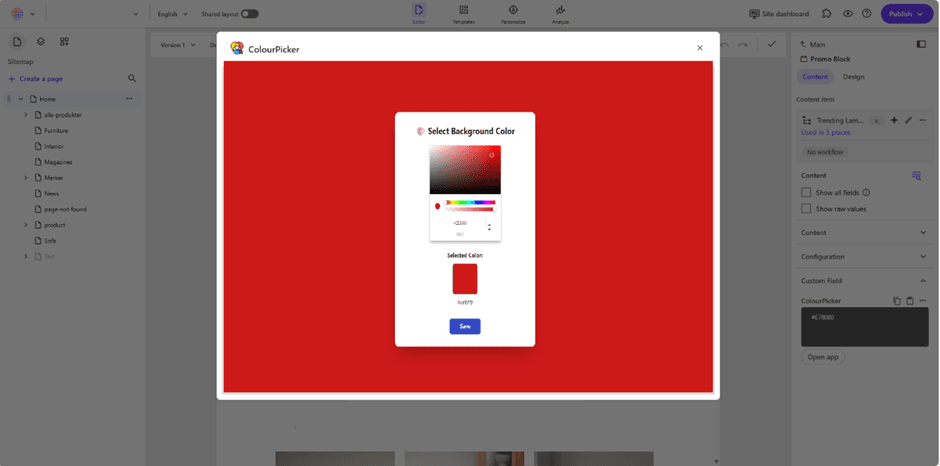
Real word use-case when opened in page-builder

Keyur Nayi- Technical lead - ADDACT
Technical lead - ADDACT
Keyur is a Technical Lead at Addact with 9+ years of experience in enterprise CMS and software engineering. He is certified in Sitecore XM Cloud, OrderCloud, Sitecore 10 .NET, and SitecoreAI CMS for Developers (2025), specializing in scalable, cloud-ready and AI-driven implementations.
His technical stack includes ASP.NET/Core, C#, MVC, jQuery, and Azure/AWS, enabling high-performance, cross-platform digital solutions.